Thursday, 5 May 2016

Troubleshooting of SharePoint 2013 Workflow


1.    User Profile Service
2.       App Management Service
3.       Managed Metadata services
4.       Workflow Proxy Services Connected
5.       Association of workflow services with targeted  Web Application

6.       Register-SPWorkflowService -SPSite http://site:port/ –WorkflowHostUri http://wfm1:12291/ –AllowOAuthHttp


7.       Make sure the “http://wfm1:12291/”  services is running and Status is Active


8.       get-WFStatus using powershell


   if not active or connected then  Verify that all the following Windows NT services are running if not then start or restart:
a.     WorkflowServiceBackend
b.     Service Bus Backend
c.     Service Bus Gateway
d.     FabricHostSvc
e.     Windows Fabric App


IF error à unable to properly communicate with the workflow service or  Create designer WF for testing. When you trying to publishing the designer WF. It will throw Scope State Error
Try to re-register proxy with scope name
Register-SPWorkflowService -SPSite http://sit:port/ –WorkflowHostUri http://wfm1:12291/ –AllowOAuthHttp –Force -ScopeName “SharePoint”

IF workflow  getting Suspended or Workflow getting Automatically Cancelled or getting Token Issue.

Refresh “Trusted Security Token Services Metadata feed” Timer job.


Configure Workflow Manager with the SharePoint Server 2013 farm

Configure Workflow Manager to work with the SharePoint Server 2013 farm
You must consider the following two key factors before configuring Workflow Manager to work with SharePoint Server 2013.
  • Is Workflow Manager installed on a server that is part of the SharePoint farm?
  • Will communication between Workflow Manager and SharePoint Server 2013 use HTTP or HTTPS?

Prerequisites
Workflow Manager is not a part of the SharePoint installation media and must be downloaded from Microsoft website.
1. We need an additional service account for Workflow Manager Service.
2. User Profile Service application must be configured and running.
3. App Management Service application must be configured and running.
Required
1.    Database Server Name and Credential
2.    WF Installation Account/SharePoint Farm Group Account
3.    Certificate Generation Key to Add Existing Farm


Installation

The first step is to download installation files. We have 2 options:
·         Install through Web Platform Installer v4
·         Install through Web Platform Installer v4 Command Line

I will use the Command Line tool – this tool allows us to download all the required components and install Workflow Manager on an online or offline machine.
1.      Download and install Web Platform Installer v4 Command Line
2.      Open an elevated command prompt and go to the installation directory
cd “c:\Program Files\Microsoft\Web Platform Installer”
3.      Run the following command. It will download Workflow Manager and the other required services: webpicmd /offline /Products:WorkflowManager /Path:c:\WorkflowManagerFiles
4.      Copy the folder with the downloaded Manager (c:\WorkflowManagerFiles) to the destination server.
5.      Open an elevated command prompt and go to the directory cd “c:\WorkflowManagerFiles\bin”
6.      Run the following command to install Workflow Manager WebpiCmd.exe /Install /Products:WorkflowManager /XML:c:/WorkflowManagerFiles/feeds/latest/webproductlist.xml
This command will install the required sevices.
7.      Run the following command to install Workfow Client WebpiCmd.exe /Install /Products:WorkflowClient /XML:c:/WorkflowManagerFiles/feeds/latest/webproductlist.xml
This command will install the required sevices.
8.      Open Workflow Manager Configuration wizard and select Configure Workflow Manager with Default Settings (Recommended).

9.      Fill in the required fields on the next page:
·         SQL SERVER INSTANCE – your SQL Server name
·         USER ID – service account for Workflow Manager service
·         PASSWORD – password for the service account
·         Allow Workflow management over HTTP on this computer – check if you need to use HTTP for testing or development. For production it is recommended to use only SSL.
·         Certificate Generation Key – key required for joining other servers to the farm


10.   Review and confirm all the information on the next page. You can also get all the installation commands for PowerShell.


11.   Review the installation status.


12.   Test the installation by browsing to the Workflow Manager site. You should see a XML definition of Workflow Service.


Configuration


Now we need to connect Workflow service with our SharePoint farm. To achieve this run the following command in SharePoint 2013 Management Shell:
1.  Register-SPWorkflowService -SPSite http://vmsp13 -WorkflowHostUri http://vmsp13:12291 –AllowOAuthHttp


SPSite parameter is your SharePoint site,  WorkflowHostUri is the Workflow Manager service URL (port 12291 is for HTTP, port 12290 is for SSL).
2.  Open SharePoint Central Administration
  1. On the Central Administration Home page, click Application Management.
  2. On the Application Management page, in the Service Applications section, click Configure service application associations.
  3. On the Service Application Associations page, select Web Applications from the View drop-down menu.
  4. In the list of Web applications, in the Application Proxy Group column, click the name of the service application connection group that you want to change.
  5. To add a service connection to the group, select the check box that is next to the service application that you want to add to the connection group. To remove a service application connection from the connection group, clear the check box next to the service application that you want to remove from the connection group. When you have made the changes that you want, click OK.


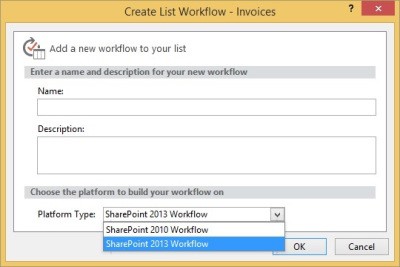
Now we can create SharePoint 2013 Workflow from SharePoint Designer 2013!


Wednesday, 4 May 2016

Get Farm GUID Uisng Powershell

Get Build version


PS C:\Users\Administrator> (Get-SPFarm).BuildVersion

Major  Minor  Build  Revision
-----  -----  -----  --------
15     0      4569   1000


Get Configuration Database Name

PS C:\Users\Administrator> (Get-SPFarm).name
SharePoint_Config_swcc


Get FARM GUID


PS C:\Users\Administrator> (Get-SPFarm).id

Guid
----
f0b6ac34-919f-4ff8-9960-c2ea9ace7319


Download all WSP From Sharepoint Server using Powershell


$pathName = "c:\WSPFiles\"
foreach ($solution in Get-SPSolution)
   {
 
    $solid = $Solution.SolutionID
    $title = $Solution.Name
    $filename = $Solution.SolutionFile.Name
    $solution.SolutionFile.SaveAs("$pathName\$filename")
}

get Application Pool ID Using Command Promopt


1. Open Command Prompt Run As Administrator
2. type the command below command
cd   C:\Windows\System32\inetsrv\        then press Enter
3. Type appcmd.exe list wp     then press enter

Now the List of Application Pool Will be Available with ID


Saturday, 16 April 2016

On Export to Excel having problem on second Click

client side in HTML Tag add

OnClientClick="_spFormOnSubmitCalled = false;_spSuppressFormOnSubmitWrapper=true;"


Example


<asp:Button ID="btnExportToExcel" runat="server" Text="Export to Excel" onclick="btnExportToExcel_Click" OnClientClick="_spFormOnSubmitCalled = false;_spSuppressFormOnSubmitWrapper=true;" />

Monday, 14 March 2016

Access on ContentBD for deployment using PoweShell


1. Open PowerShell window "Run as Administrator"
2. put in below script desired SiteCollectionName and UserName whom need to grant permission.


$contentdb = Get-SPContentDatabase -Site http://serverName/sites/siteName
Add-SPShellAdmin -UserName 'domainName\userloginid' -database $contentdb

Thursday, 10 March 2016

Web services/WCF binding on Client Machine


Step 1. Accessing Web services with impersonation Credential 

          1. Add Service reference in Project.
          2. Add Service NameSpace
                     using MyNameSpace.MyNameSpacee;
                         MyNameSpacee.MyWebServiceSoapClient myNameSpacee = new MyWebServiceSoapClient();


Step 2. change the binding in web.config/App.Config like below...


<system.serviceModel>
        <bindings>
            <basicHttpBinding>
              <binding name="MyWebServiceSoap">
                <security mode="TransportCredentialOnly">
                  <transport clientCredentialType="Ntlm" proxyCredentialType="None" realm=""/>
                  <message clientCredentialType="UserName" algorithmSuite="Default"/>
                </security>
              </binding>
            </basicHttpBinding>
        </bindings>
        <client>
            <endpoint address=""
                binding="basicHttpBinding" bindingConfiguration="MyWebServiceSoap"
                contract="MyNameSpace.MyWebServiceSoap" name="MyWebServiceSoap" />
        </client>
    </system.serviceModel>

          3. Add Dynamically Address for current Web

  myNameSpacee.Endpoint.Address = new System.ServiceModel.EndpointAddress(SPContext.Current.Web.Url+"/_layouts/15/MyWebServices/MyWebService.asmx");

OR

Add Static Services Address in

Web.config/App.config like below inside Client Tag

 <client>
            <endpoint address="http://site:port/_layouts/15/MyWebServices/MyWebService.asmx""
                binding="basicHttpBinding" bindingConfiguration="MyWebServiceSoap"
                contract="MyNameSpace.MyWebServiceSoap" name="MyWebServiceSoap" />
        </client>


            myNameSpacee.ChannelFactory.Credentials.Windows.ClientCredential = System.Net.CredentialCache.DefaultNetworkCredentials;
            myNameSpacee.ClientCredentials.Windows.AllowedImpersonationLevel = System.Security.Principal.TokenImpersonationLevel.Impersonation;


4. finally Call your WebMethod 


myNameSpacee.GetMYMethod();


OutLook Add-In VSTOInstaller.exe.config error while installing Add-in

Error like below 


The value of the property 'type' cannot be parsed. The error is: Could not load file or assembly 'Microsoft.Office.BusinessApplications.Fba, Version=14.0.0.0, Culture=neutral, PublicKeyToken=XXXXXXXXX' or one of its dependancies. The system cannot find the file specified. (C:\Program Files (x86)\Common Files\Microsoft Shared\VSTO\10.0\VSTOInstaller.exe.Config line 10)

or

The value of the property 'type' cannot be parsed. The error is: Could not load file or assembly 'Microsoft.Office.BusinessApplications.Fba, Version=14.0.0.0, Culture=neutral, PublicKeyToken=XXXXXXXXX' or one of its dependancies. The system cannot find the file specified. (C:\Program Files\Common Files\Microsoft Shared\VSTO\10.0\VSTOInstaller.exe.Config line 10)


Solution


  • Open Windows Explorer
  • Open the folder C:\Program Files (x86)\Common Files\Microsoft Shared\VSTO\10.0
  • If that folder does not exist, try C:\Program Files\Common Files\Microsoft Shared\VSTO\10.0
  • Rename the file VSTOInstaller.exe to VSTOInstaller.exe.Config

Tuesday, 8 March 2016

GroupBy With LinQ

  var mainQuery = finaldocCount.GroupBy(u => new { u.ProjectCode })
                                                                      .Select(grp => new
                                                                      {

                                                                          ProjectCode = grp.Key.ProjectCode,
                                                                          mailList = grp.ToList()
                                                                      }).ToList();


                          foreach (var item in mainQuery)
                                {
                                    foreach (finalNameCount v in item.mailList)
                                    {

                                        v.Name;


                                    }
                                }